How to insert and Format a shape in MS-Word?
Step-1:
click on the Insert Menu, and then
go to Subgroup ‘Illustrations’ and select the
Shape Command, here is
a lot of Shapes
Shown and select any one of them.

Step-2:
There is a shape that I select from
“Insert Menu”. Now I
want to change the
perimeters of it.

Step-3:
Take the mouse curser on the Shape and
Right click on it. It’ll be select and three colors are
Shown on it.
·
Blue
points used for resize the shape.
·
Green
Point used for Rotate the Shape.
·
Yellow
point used for smooth edges.

Step-4:
when we right click on the shape,
There is a dialogue box open then select
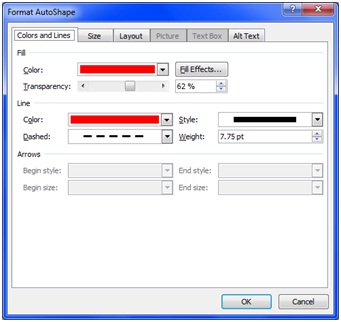
 “Format Auto Shape” as show in figure.
Step-5:
There is more menus’ here, names are,
1.
Colors
and Lines
2.
Size
3.
Layout
4.
Alt
Text
Step-6:
First we select “Colors and Lines”
Menu, There are three options.
·
Fill
·
Line
·
Arrows
Step-7:
In Fill option we can change the
shape color, transparency level of the shape and fill effect of Shape.
Step-8:
If we want to change the color of
shape then select change color
and then choose the color.
 |
Step-9:
If we want to change the
Transparency level of shape then
select the “Transparency” option.
Step-10:
If we want to change the color
setting Of the shape
then go to
“Fill Effect”. A
dialogue Box will be open
Select the “Gradient” Menu.
There are three more
options
·
Colors
·
Transparency
·
Shading
Styles
In Color option we can change the color of shape in one color, two color and preset

Step-11:
If we select the option” Two Color”
then the shape color
is divided into two colors
and select any shade that you want,
as shown in fig.
Step-12:
If we want to change the size,
shading
Style of shape border then
go to “Color and
Line” menu and select the Line option, here
we can change the
color, style and size of
 the shape border.


Comments
Post a Comment